Related Resources
- What Is a CMS and Why Should You Care?
- What is a content management system (CMS)?
- Headless CMS Explained
- Headless CMS explained in 2 minutes
- One of my favorite videos from one of the founders of Sanity.io
- Sanity Crash Course: Learn The Basics in 20 Minutes!
- Embed Sanity into your Next.js project in 30 seconds
- Getting Started with Sanity Studio
- Sanity Configuration
- Desk Tool API
- Create a schema and configure Sanity Studio
- Document Type
- Schema Type
- Slug Schema Type
- Block Content & Portable Text
- Introduction to Portable Text
Pre-Workshop
It’s important that you understand what a Content Management System(CMS) is before we go into Sanity.io. More specifically, what a Headless CMS is.
What is a Headless CMS?
A headless CMS is a content management system that separates where content is stored (the “body”) from where it is presented (the “head“). It separates information and presentation. This enables content reuse and remixing across web, mobile, and digital media platforms as needed. You could even reuse your content in print.
For our sake, our website will be the “head” and Sanity.io will be the “body”.
Format-agnostic content unlocks a fundamentally better experience for everyone—authors, developers and users.
Authors get a fully custom editor with structured data models. Developers get a focused API delivering performant querying and filtering. And ultimately, users get content how and where they want it.
Why Headless?
Like most technological innovations, headless CMSes grew out of a set of needs that could no longer be met by a traditional monolithic CMS. This shift was kickstarted by the advent of smartphones in the late 2000s and has only accelerated as digital media platforms become more and more diverse.
You now have screens on your wrist, in your car, on your tractor, on your fridge, and in your glasses—not to mention the classic triumvirate of TVs, computers and phones.
How we consume content has fundamentally changed over the last decade and so how we store that content has also had to evolve and improve. Enter next-gen headless CMS platforms, like Sanity, where the content is decoupled from code allowing it to be remixed and reused. Wherever and however it is needed. Billboards to watches.

How does it work?
A headless CMS works by separating the content authoring experience from the software development experience, giving editors an interface for managing content and providing that content via APIs for developers to query and build applications with.
Content authors get to focus on content. Developers get to focus on code. Everyone is doing what they do best.
By comparison, a traditional CMS blurs lines between roles, making you part developer, part writer, and part security analyst. Just like a dinner party, this works well on a small scale but can quickly become overwhelming as a business grows.
The content stored in the headless CMS is accessed via a set of APIs that developers can use to present the data wherever they need.

Headless CMS Benefits
A headless CMS is a powerful and flexible way to manage content. It allows for faster editing experiences and the ability to manage content for multiple channels. It offers developers the flexibility to choose their own frontend tooling and makes it easier to scale. In addition, headless CMS also offers enhanced security by separating content from the presentation layer.
- Faster editing experiences: Traditional CMS architectures have to spend resources on content editing and content rendering. A headless CMS has an advantage over traditional alternatives because it doesn’t have to deal with the rendering side of things. That’s left to other more specialized parts of your stack.
- Manage content for more channels: Truly headless content isn’t tied to a single presentation concern (e.g. website), so it can find an audience across multiple channels. You can use a headless CMS to manage content for apps and websites. You can even manage your internal/admin content in the same place and extract more value from it that way.
- Developer flexibility: Because headless content is served over APIs, developers can choose their own front-end tooling. If you’d prefer to work with Javascript instead of PHP or Ruby, you can do that. You can also interchange parts of your stack or move from one framework to another without affecting the CMS.
- Easier scaling: Headless lets you manage your content from a single source of truth, change developer tools at any time, and benefit from sending your content to high-performance cloud-based hosting and build services like Vercel and Netlify.
- Enhanced security: Because headless content is separated from the presentation layer it’s a smaller area of attack.

Taken from Sanity.io’s Headless CMS Explained
Creating a Sanity.io Account
Before we can start using Sanity.io, we need to create an account. Go to sanity.io and click on the Get Started button. Whatever you use, make sure you remember your username and password - this is how we’ll manage our projects.
Embed Sanity.io into Next.js
In the past, when you wanted to use Sanity.io with your Next.js project, they had to be seperate projects. Now, we can install Sanity.io into our Next.js project. This is a huge improvement because we can now have our Sanity.io project and our Next.js project in the same repository. This makes it easier to manage our projects. It’s also nicer, because we can choose a specific route to host our Sanity Editor.
This video also goes over the same steps -> Embed Sanity into your Next.js project in 30 seconds
Now, we can initialize Sanity.io into our Next.js project:
- Make sure you’re in your Next.js project
- Run
npm create sanity@latestin the root of your project - Login into your Sanity.io account
- Follow these steps:
- Select project to use Create new project
- Your project name: My Website
- Use the default dataset configuration? Yes
- Would you like to add configuration files for a Sanity project in this Next.js folder? Yes
- Do you want to use TypeScript? No
- Would you like an embedded Sanity Studio? Yes
- Would you like to use the Next.js app directory for routes? Yes
- What route do you want to use for the Studio? /studio
- Select project template to use Clean project with no predefined schemas
- Would you like to add the project ID and dataset to your .env file? Yes
If you see “Success! Your Sanity configuration files has been added to this project” - then you successfully have embed Sanity.io into your Next.js project. In the past, we would have to do most of this stuff manually. Sanity.io has made it easier for us to get started with their CMS, especially when using Next.js.
Taking a look at Sanity
There’s a few things that Sanity generated from it’s initalization process. Let’s take a look at them.
-
.env- This is where we store our Sanity.io project ID and dataset name. This is important because we need to connect our Sanity.io project to our Next.js project. This file is meant to hold what we call Environment Variables. These are variables that are meant to be used in our code, but we don’t want to hardcode them. This is because we don’t want to expose our project ID and dataset name to the public. If we were to hardcode them, then anyone could see them. This is a security risk.You’ll find that
NEXT_PUBLIC_SANITY_DATASET="production"andNEXT_PUBLIC_SANITY_PROJECT_ID="???????"are in this file. These variables are what seperate one Sanity.io project from another. This is how Sanity.io knows which project to connect to. If you were to create another project, you would have a different project ID. You can find these variables in your Sanity.io dashboard on their website.It’s not actually ??????? but that’s a placeholder for your project ID.
-
sanity.config.js- This file is used for our project’s information, along with importing additional plugins. (We’ll talk about this later!) You’ll see that the dataset and project ID are imported from/sanity/env.js. This is where our environment variables are stored and used.The file is also extremely helpful when it comes to the layout of what our Sanity Studio will look like. You can actually describe how you want items to show up and in what way you’d want to edit them. Sanity.io is extremely customizable, and this configuration file is one of the reasons why.
You’ll also see
schemabeing imported. More on that below.deskTool()is a top-level view within Sanity Studio in which content editors can drill down to specific documents to edit them.visionTool()is a tool that lets you query your content - we’ll cover more on this in the next workshop, when we’re fetching our Sanity data from the Next.js end. sanity.cli.js- This is the CLI (Command Line Interface) configuration file. We won’t touch it, but it lets you set up project-specific configurations if you want to mess with Sanity via the command line./sanity/schema.js- This is where we can define our schemas. A schema is a blueprint for how our data will be structured. We’ll talk more about schemas in a bit./sanity/env.js- This file takes our environment variables from.envand exports them. This is so we can use them in our code. This is also where we can add additional environment variables if we want to. (You can use them directly from.envbut this is a cleaner way of doing it.)/sanity/lib/client.js- This is how we’ll fetch data from Sanity to our Next.js project. We’ll talk more about this in the next workshop. It relies on the dataset and project ID from/sanity/env.js./sanity/lib/image.js- This is for Sanity.io’s Image Pipeline. Images aren’t handled as simply as URLs in Sanity, but as more complex objects providing us with many options for image manipulation./app/studio/[[...index]]/page.jsx- This is where our Sanity.io Studio will be. The[[...index]]is a dynamic route that will allow us to have multiple pages in our editor. This is a bit out of scope for our overall workshop series, but we’ll touch a bit more on dynamic routes in the next workshop.
Check
.gitignore, which file is ignored? (answer:.env) This is because we don’t want our.envfile to be uploaded to GitHub. This is because we don’t want to expose our project ID and dataset name to the public. If we were to hardcode them, then anyone could see them. This is a security risk. But how does our site know what our project ID and dataset name is? We’ll get to that later.
This is a great time to make a commit! Make sure you add a commit message, and then push it to GitHub.
Accessing our Sanity Studio
While your overall project is running via npm run dev, you can access the Sanity studio with the following URL: http://localhost:3000/studio. It should look similar to this:

We haven’t defined any schemas yet, so there’s nothing to show.
Fixing the Navbar layout bug
Are you seeing your Navbar on the Studio at the top? That’s because we’re using the same layout for our Studio as we are for our website. We don’t want that. Let’s fix it.
"use client";

import { usePathname } from "next/navigation";
import Link from "next/link";

export default function Navbar() {
  const pathname = usePathname();
  if (pathname != "/studio") {
    return (
      <nav className="border-b sticky top-0 bg-primary-900 text-primary-100 border-primary-800 z-10">
        <div className="h-14 max-w-7xl p-4 mx-auto flex items-center justify-between">
          <Link href="/" className="font-medium text-lg md:hover:underline">
            My Website
          </Link>
          <ul className="hidden md:flex items-center justify-end space-x-4 text-sm font-medium">
            <li className="md:hover:underline">
              <Link href="/blog">Blog</Link>
            </li>
            <li className="md:hover:underline">
              <Link href="/photos">Photos</Link>
            </li>
          </ul>
        </div>
      </nav>
    );
  }
}
We’re using the usePathname hook from next/navigation to get the current pathname. If it’s not /studio, then we’ll show the Navbar. Otherwise, we won’t. Also, notice the “use client” comment at the top. This is because we’re using the usePathname , which is a client-side . This means that it can only be used on the client-side, and not the server-side. That means we can’t use any async functions or fetch requests in this component. We briefly alluded to this in the last workshop - since we’re able to choose which components are rendered on the server-side and which are rendered on the client-side, this is not a problem.
This is a great time to make a commit! Make sure you add a commit message, and then push it to GitHub.
If you’re interested more on how this actually works, check out the Bonus Workshop on Interaction Development.
What is a Schema?
We’ve thrown around the term Schema a few times now, but what is it? A schema is a blueprint for how our data will be structured. It’s a way for us to define what our data will look like. We can define what type of data we want, what it’s called, and how it’s structured. We can also define what type of data we want to be required, and what type of data we want to be optional.
Schemas are comprised of various fields and content types, which Sanity will build the user interface for. For example, if I wanted to make a schema for a Dog, it might look like this:
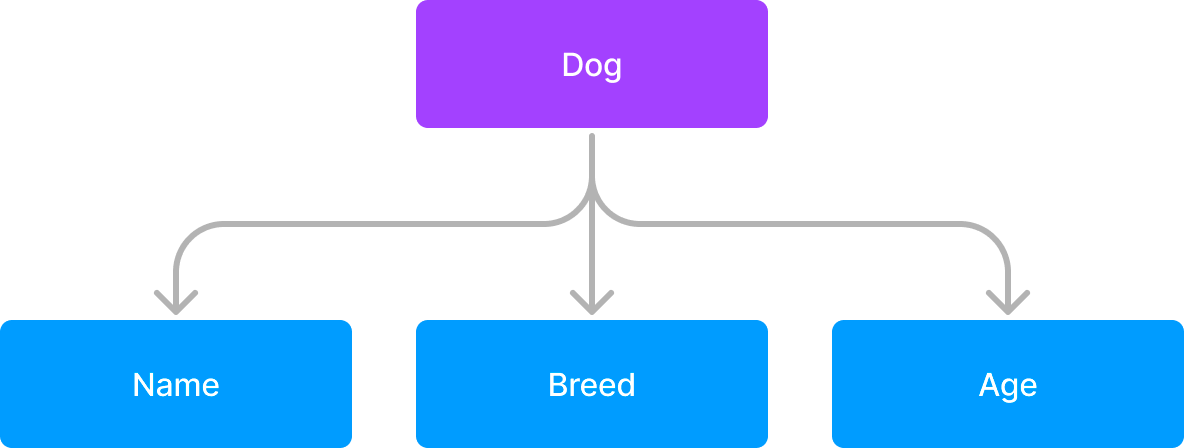
It might be easy to have Name and Breed be Strings(normal text), and the Age to be a number. But let’s take a closer look at Breed;
Multiple Schemas
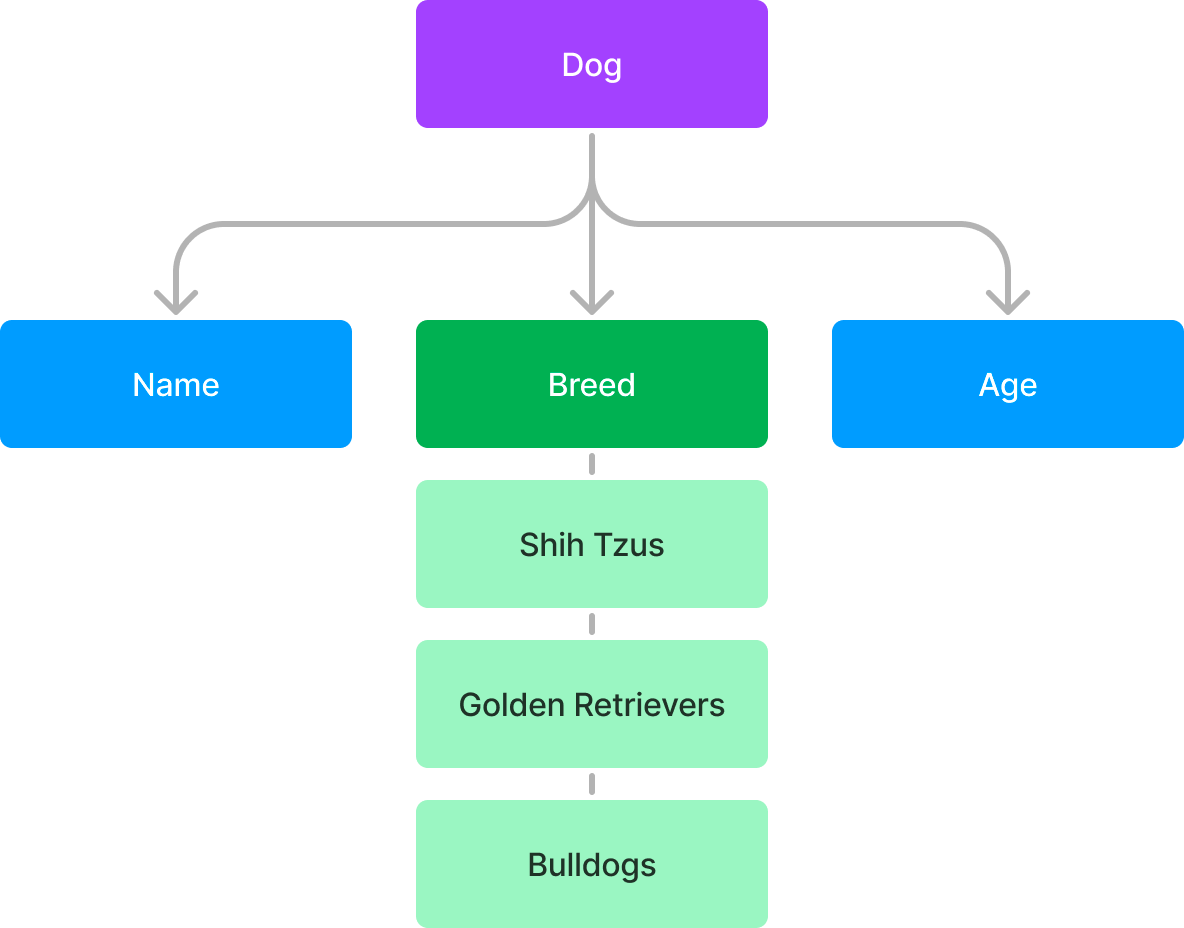
There are various breeds of dogs, and we might not want to have the problem of inserting a breed that doesn’t exist. Maybe we only have three breeds, and don’t want any other options.
- Shih Tzus
- Golden Retrievers
- Bulldogs
So our we might might change our schema and have it look like this:
Now, the more breeds we want to add to Breed as an option, the longer that array of options gets, and the more complicated it gets. Luckily, now we’ll see the power of the schema - we can create another schema specifically for breeds.
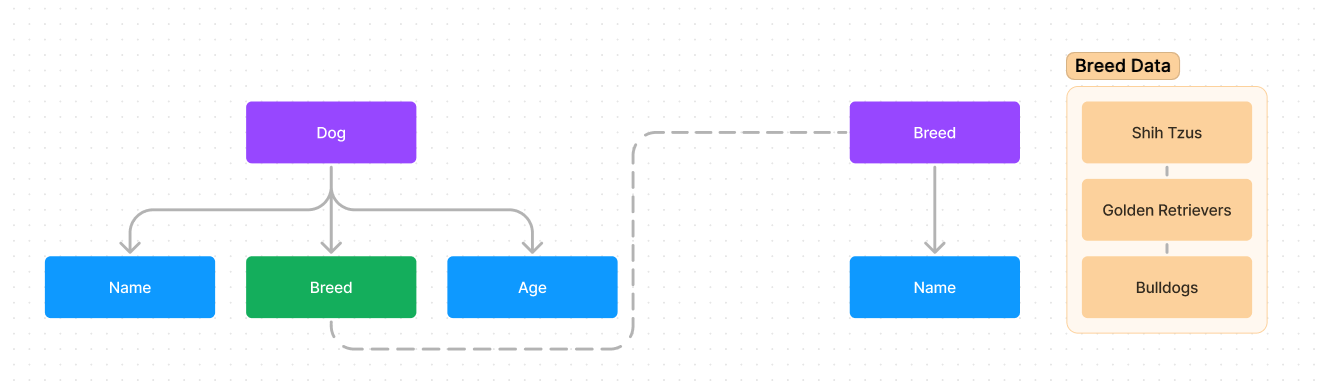
Now, we can make many different breeds based on the Breed schema, and use those breeds in the Dog schema!
An easy way to think about Schemas is a custom data type. We can make more data relating to one type and use it in other types and vice versa. Next, we’ll turn this into code, as we learn about Documents and Objects.
Document Schemas
There are two types of schemas we can define. The first is Document. (We’ll cover Objects in the next Workshop) When working with Sanity, everything starts with the document. It’s the main type of schema, and all other types are defined with a document.
They’re unique, contain metadata on creation and manipulation, and form the basis of how we’re going to make our schemas in the Studio we already set up.
Before we make our first document schema, let’s update our file structure to support many schemas:
- Make a folder named
schemain/sanity - Place
schema.jsinto/sanity/schemaand rename it toindex.js - Inside of
/sanity/schema, make two folders:documentsandobjects
This will make organizing all of our schemas easier. Now, let’s make our first document schema.
Making a Document Schema
On our website, we have a page to show off some of our photos. Let’s make a document schema for this. First make a file called photo.js inside of /sanity/schema/documents. Then, let’s make our schema:
export default {
  name: "photo",
  title: "Photo",
  type: "document",
  fields: [],
};
This is how we define a document schema. Let’s break it down:
name- This is the name of our schema. This is the pure name of the schema we’ve made, akin to the name of a data type. Make sure you keep it unique and easy to remember for this schema.(Keep in mind that changing the name field after having data will cause the removal of all data that contains the type.)
title- This is the title of our schema. This is what will show up in the Sanity Studio. This is a purely visual thing, and doesn’t affect our code.type- This is the type of schema we’re making. In this case, it’s a document schema.fields- This is the array where we define our fields.
Adding schema types to our document’s fields
There’s a few things we want in our photo schema:
- The photo itself
- A description of the photo
- Whether it’s favorited or not
In Sanity, we call the data types that represent fields schemas. Wait, but that’s a bit confusing, isn’t it? Hopefully this will simplify it:
- At the highest level, we have document and object schemas
- Within document and object schema fields, we can have any schema type except document schemas (we can create references to them however)
Let’s get into the code:
export default {
  name: "photo",
  title: "Photo",
  type: "document",
  fields: [
    {
      name: "favorite",
      title: "Favorite",
      type: "boolean",
    },
    {
      name: "image",
      title: "Image",
      type: "image",
      validation: (Rule) => Rule.required(),
      options: {
        hotspot: true,
      },
    },
    {
      name: "description",
      title: "Description",
      type: "string",
      validation: (Rule) => Rule.required(),
    },
  ],
};
Let’s break down what we’ve done:
- We’ve added three fields to our schema:
favorite,image, anddescription favoriteis a boolean, which means it’s either true or false. It’s not required to have a value.imageis an image, which means we can upload an image to our schema. We’ve also made it required, so we have to upload an image.- You might notice we have
hotspot: trueunderoptions. This is so we can crop our images for different aspect ratios. We can resize them to fit a few different ones, so in our code for our site, we can choose and always make sure it fits.
- You might notice we have
descriptionis a string, which means it’s normal text. We’ve also made it required, so we have to add a description.
Adding our schema to our Sanity Studio
If you go back to the Studio, you’ll see that nothing has changed. This is because we haven’t added our schema to our Studio yet. Let’s do that now.
import photo from "./documents/photo";

export const schema = {
  types: [photo],
};
Now, if we go back to the Studio, we’ll see that our schema has been added!
This is a great time to make a commit! Make sure you add a commit message, and then push it to GitHub.
Adding documents
Click on the Photo list item on the Content sidebar. You’ll see that we can add a new photo. Let’s do that now. Click on the Writing Icon, and you’ll see that we can add a new photo! All of the schema types we defined are there as well.
When you add a new photo, you’ll see that it’s added to the list. You can also edit it by clicking on it. You’ll see that the fields we defined are there as well. Everything in Sanity auto-saves, but is left in a “draft” state until you publish it. You can publish it by clicking on the Publish button on the bottom right.
You can also unpublish content by clicking on the arrow to the right of the publish button.
Right now, go crazy and make some photos!
Seeing our data
We’ll talk more about this in the next workshop, but click on the Vision button in the Navbar of Sanity Studio. Then, paste the query below into the Query panel on the left. Finally, click on the Fetch button on the bottom left. You should see your data!
*[_type == "photo"]
[…] 2 items
  0:{…} 8 properties
    _updatedAt:2023-10-15T05:32:50Z
    image:{…} 2 properties
    favorite:false
    _createdAt:2023-10-15T05:32:50Z
    _rev:8oA0Fnxlz0IlfCSlPMjoh2
    _type:photo
    description:Photo 2
    _id:36afe0b6-05fd-4380-8779-d0763b09d8c9
  1:{…} 8 properties
    favorite:true
    _createdAt:2023-10-15T05:32:35Z
    _rev:8oA0Fnxlz0IlfCSlPMjnhO
    _type:photo
    description:Photo 1
    _id:59e2cb9e-9c10-4cd9-b97b-deba0e3a387b
    _updatedAt:2023-10-15T05:32:35Z
    image:{…} 2 properties
This is a more detailed version of JSON, but trust that this is our data. We’ll talk more about how to interpret this in the next workshop. The big thing here is to see how our schema types are represented in our data, and how we can use them to make our data more structured.
Don’t believe me? Look at the generated URL in the top right of Vision and paste that into a new tab. You’ll see JSON.
Creating a blog post
Now, let’s work on our blog. We’ll start with the document schema. Make a file called blogPost.js inside of /sanity/schema/documents. Then, let’s make our schema:
export default {
  name: "blogPost",
  title: "Blog Post",
  type: "document",
  fields: [
    {
      name: "title",
      title: "Title",
      type: "string",
      validation: (Rule) => Rule.required(),
    },
    {
      name: "slug",
      title: "Slug",
      type: "slug",
      validation: (Rule) => Rule.required(),
      options: {
        source: "title",
        maxLength: 96,
      },
    },
    {
      name: "description",
      title: "Description",
      type: "text",
      validation: (Rule) => Rule.required(),
    },
    {
      name: "date",
      title: "Date",
      type: "date",
      validation: (Rule) => Rule.required(),
    },
    {
      name: "image",
      title: "Image",
      type: "image",
      validation: (Rule) => Rule.required(),
      options: {
        hotspot: true,
      },
    },
  ],
};
This document schema should be pretty straightforward. We have a title, description, date, and image. There’s also a…slug?
You might have seen how the description in the photo schema was a string, but now it’s a text. This is because we want to have multiple lines of text for our description, and not just one line. Strings are mainly for one line of text.
Slugs!
This is a slug:

This is also a slug:
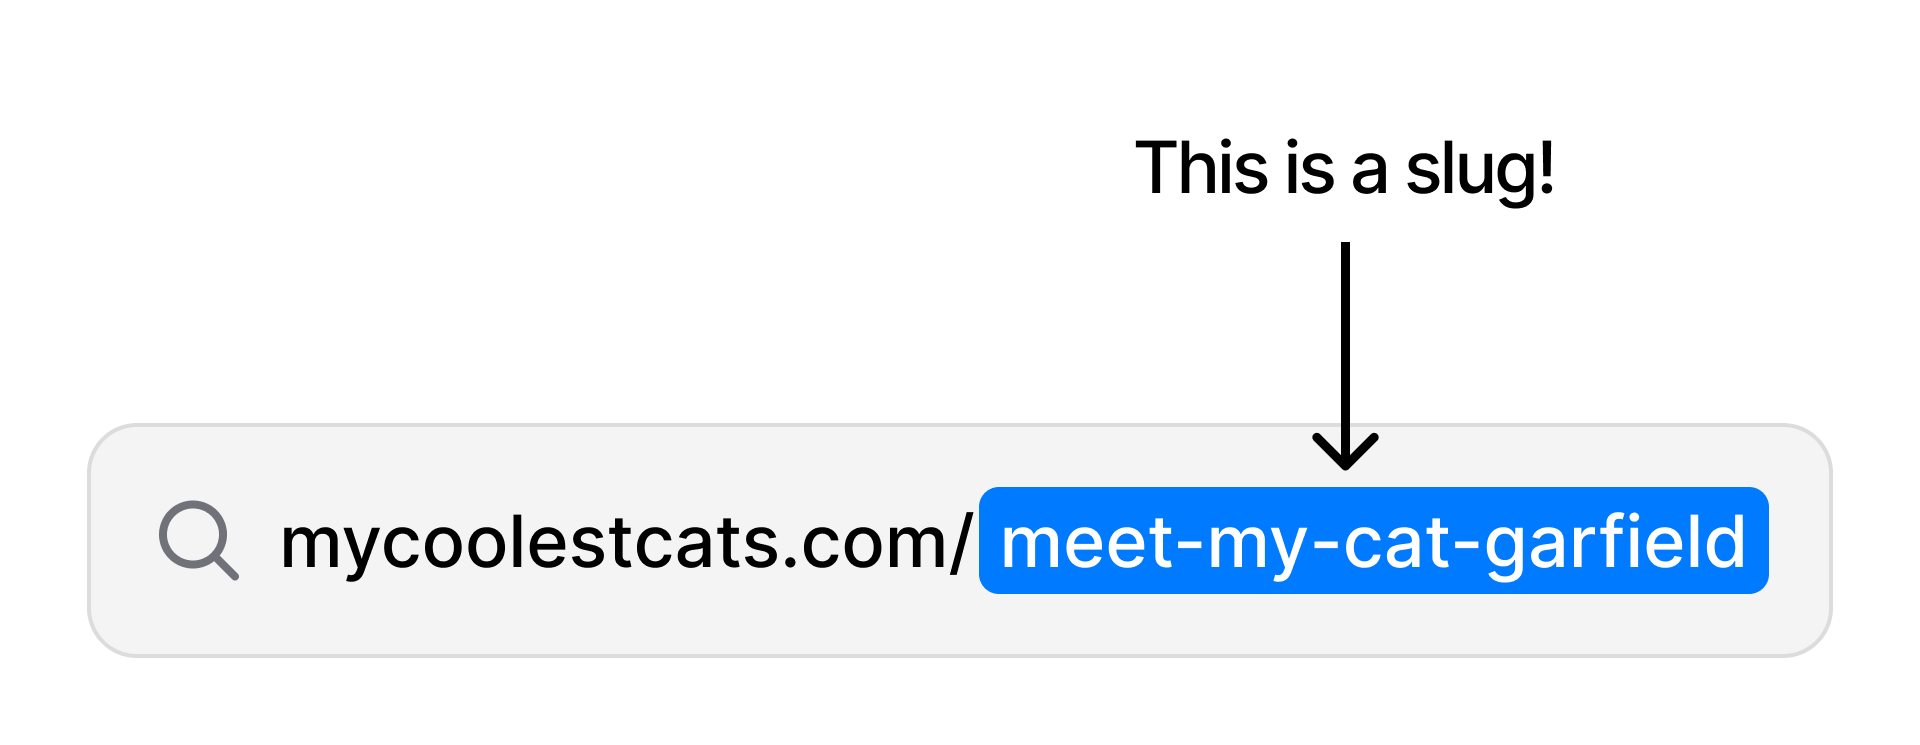
See the similarities? Yeah, me neither - the similarity starts and ends with their name: slug.
The slug we’ll be focusing on is the second, and it’s actually a lot more important than you might think. A slug is a uniquely-specified string apart of your URL that helps us locate specific pages and documents.
If you go to some of your favorite sites, you’ll see slugs everywhere! For our blog post, we want pages for each of our posts, and slugs help us do that by providing a URL-friendly string that we can use to uniquely identify the post we want. It’s pretty easy to make, but we have some additional options:
source: This defines which field we want to use to make our Slug from - it makes the most sense to choose ourtitlemaxLength: This is the maximum length we want our slug to be. For URLs, if we can keep them short and readable, we should.
Since our source is title, we won’t be able to generate it until we have a title. But we’re missing one more thing before we can add our schema and start making blog posts.
Block Content & Portable Text
Ever wonder how Google Docs lets you make lists, bold text, and add images? It’s because they use something called Block Content. Block Content is a way for us to make rich text, and it’s a bit more complicated than just a string.
Portable Text is a specification for block content that allows us to structure and detail our content however we want. A rich text editor that allows us to add additional data structures to it.
Understanding Portable Text
If we look at a large heading, how would that look in Portable Text? Well, we know a large heading is bolded and large. When you create a H1 in Portable Text, here’s what that actually looks like:

As you can see, there’s the text of our heading, as well as the style. There’s only one piece of text, so we only have one child.
What if we want some rich text? How would that look, with bolding, underlining, and multiple pieces of text?

We have multiple children this time, to distinguish different pieces of text from each other. They all are under this block of a normal style, as well. The marks fields are used to provide further styling for these text children.
For example, the “This part is bolded” has a strong mark, to show that its bolded. The same goes for the “this part is underlined”, where we have an underline mark.
What about an Image? How does that look?
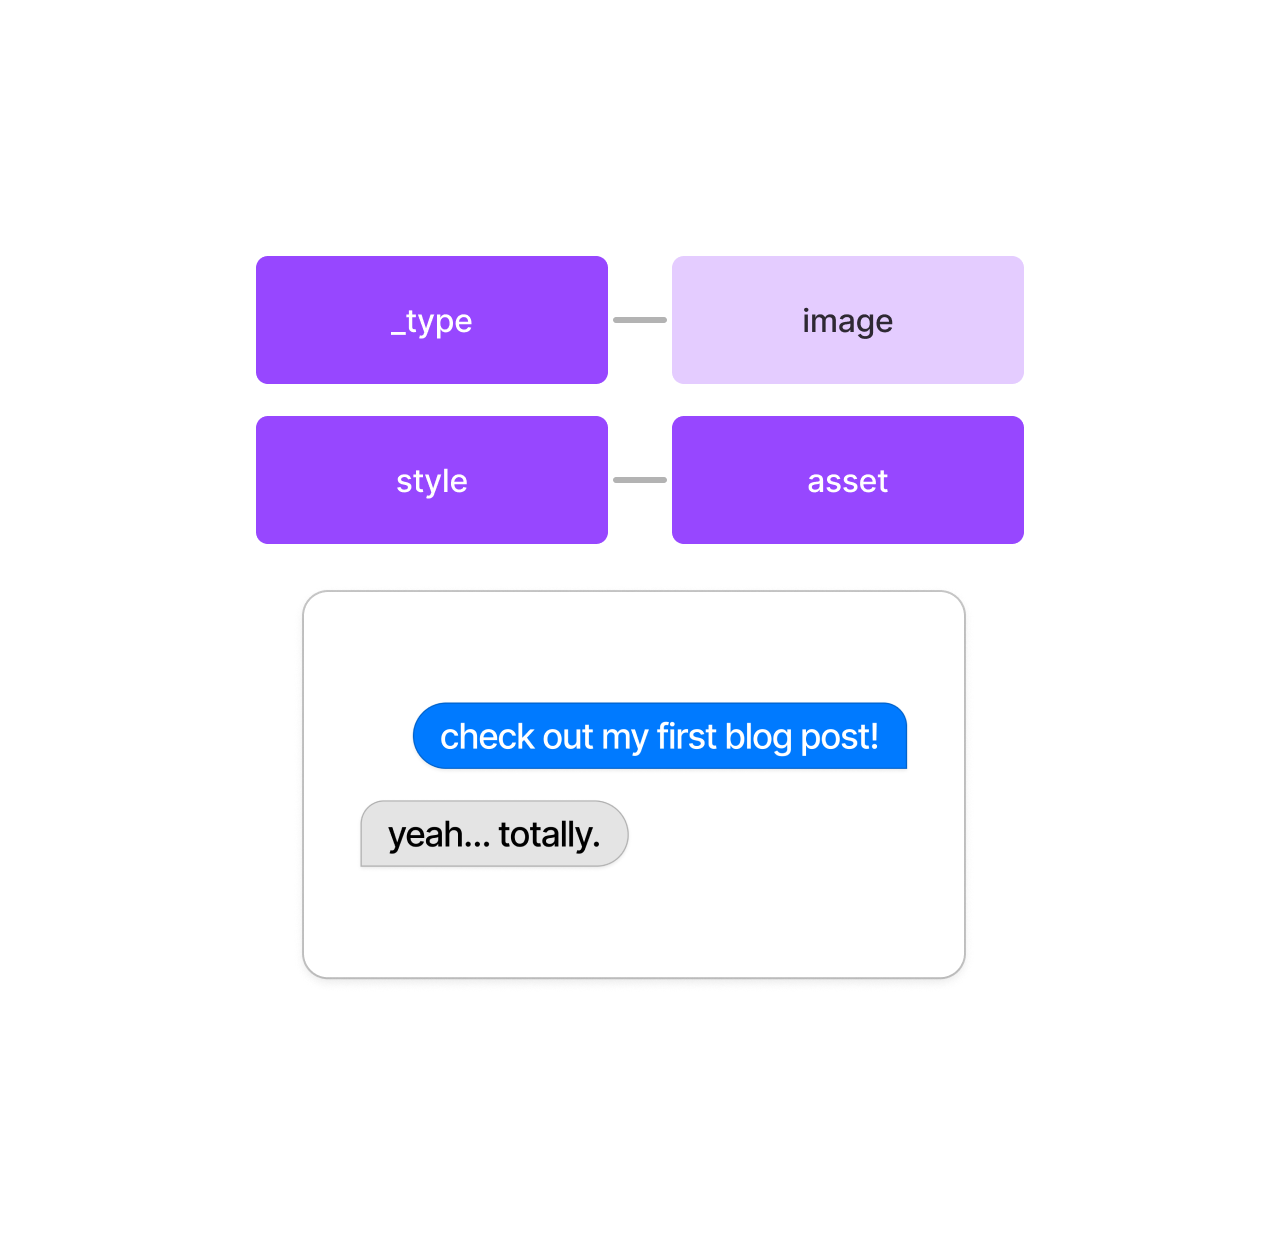
It looks basically the same way it would if we called for this schema type in GROQ - this is because of how references work, and Sanity expects you to use their URL generation tool on your website/app/whatever to get the image URL and metadata.
Putting it all together
So how does this look put together?

All that data (and more that I didn’t put in this graphic), just for that much? Doesn’t seem that worth it… But it is - with Sanity’s low latency in Execution and End-to-end times, we can pull and process this amount of data very fast.
Don’t believe me? This entire page you’ve been reading and every page on this site has been written in Portable Text.
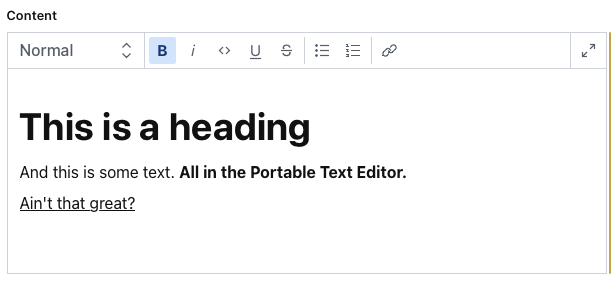
Adding Block Content
Enough talking, let’s add a Portable Text Editor to our Blog Post document and start writing.
export default {
  name: "blogPost",
  title: "Blog Post",
  type: "document",
  fields: [
    {
      name: "title",
      title: "Title",
      type: "string",
      validation: (Rule) => Rule.required(),
    },
    {
      name: "slug",
      title: "Slug",
      type: "slug",
      validation: (Rule) => Rule.required(),
      options: {
        source: "title",
        maxLength: 96,
      },
    },
    {
      name: "description",
      title: "Description",
      type: "text",
      validation: (Rule) => Rule.required(),
    },
    {
      name: "date",
      title: "Date",
      type: "date",
      validation: (Rule) => Rule.required(),
    },
    {
      name: "image",
      title: "Image",
      type: "image",
      validation: (Rule) => Rule.required(),
      options: {
        hotspot: true,
      },
    },
    {
      name: "content",
      title: "Content",
      type: "array",
      of: [
        { type: "block" },
        {
          type: "image",
        },
      ],
    },
  ],
};
You’ll notice that we’ve added a new field called content. This is our Block Content, an array composed of blocks and images. We can add as many blocks and images as we want, and they’ll all be rendered in the order we put them in.
Now, let’s add it to our schema list:
import blogPost from "./documents/blogPost";
import photo from "./documents/photo";

export const schema = {
  types: [photo, blogPost],
};
This is a great time to make a commit! Make sure you add a commit message, and then push it to GitHub.
You’ll now see it inaction in the Studio! You can add as many blocks and images as you want, and they’ll all be rendered in the order we put them in.
Make a new blog post, and you’ll see your editor at the bottom!
Open it up and go crazy! You can create all types of content now.
By default, it has a ton of different options for rich text:
- Headings 1 through 6 (Block Styles)
- Normal and Blockquote Text (Block Styles)
- Bold, Italics, Underlining, Code, and Strikethrough (Inline Styles)
- Ordered and Unordered Lists
- Links
Block Styles apply to blocks of content - such as a heading or normal text. They apply to the whole piece of text. Inline Styles apply to parts and pieces of text within blocks.
Here’s an example of some content we made:

We can do so much more with Portable Text - any object or schema type can be added into the array we have made. You can do anything you want with it, from adding blocks of code to audio recordings.
The biggest strength of using Portable Text over other rich-text formats such as Markdown is the flexibility and extendibility. You can always add more or less, whatever you need. You’re also not confined to how you want to use Portable Text.
Funny enough, these lesson plans are written in Markdown - not Portable Text. This is because I don’t need to add any additional data to my text, and I don’t need to add any additional styling beyond the bare minimum. A part of being a good developer is knowing when you need to use something, and when you don’t. Portable Text does require fetches, and this site doesn’t really need that, it’s just parsing through Markdown files.
Practice
- Make more document schemas of your own!
- Maybe for authors on your website?
- Do you have a ton of pets?
- Maybe you want to document some of your favorite recipes?
- Explore the options of schema types you can use
- Sanity has so many different types of Schema Types you can use, and they’re all documented here